- 易迪拓培训,专注于微波、射频、天线设计工程师的培养
CST2013: Rotate Face Dialog
 Modeling: Shapes
 Extrusions
 Rotate
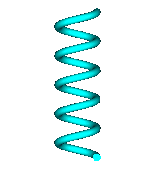
Rotate a picked face around a picked edge. With this function you may create circles or helixes with the picked face as profile.
After you have created a new shape by rotation, the Shape Intersection Dialog box will open. There you may add the rotated shape to the original shape from which you picked the face.
If you have picked a face which can not be rotated, or when you have not picked any face, you will get to the Rotate Profile Dialog box.
Name
Specify the name of the new shape to be created by the rotate action.
Angle
Specify the angle in degree by which the face shall be rotated.
Height
To receive a helix you can specify the height of the helix.
Radius Ratio
This parameter influences the radius of the helix (height must be greater zero) depending on the height. You can set the ratio between the radius of the end point and the starting point in order to design a conical helix. If it is 1.0 the radius is constant over the height of the helix.
Segments per turn
This parameter influences the number of linear shape sections which are assumed for one turn. This option is useful if the analytical description (Segments per turn = 0) of the turn is not necessary to reach the desired accuracy. In this case a segmented approximation is the faster way (you can get sufficient results for most cases with 10 Segments per turn).
Examples
The three pictures below illustrate the results for different construction parameters.
Segments per Turn : 0 Radius Ratio : 1.0 |
Segments per Turn : 10 Radius Ratio : 1.0 |
Segments per Turn : 0 Radius Ratio : 10 |
|
Component
Choose a new component from the select list. You can also create a new component by typing the name of the new component.
Material
Select the material to which this shape will be assigned from the list of previously defined materials or create a new material by selecting [New Material...]. You can also load a material from the material library by selecting [Load from Material Library...].
OK
Press this button to finally create the shape.
Preview
Press this button to create a preview image of the new shape. This option is very useful to check the settings before you actually create the shape.
Cancel
Closes this dialog box without performing any further action.
Help
Shows this help text.
CST微波工作室培训课程套装,专家讲解,视频教学,帮助您快速学习掌握CST设计应用
上一篇:CST2013: Make Wire From Curve
下一篇:CST2013: Manage Material Sets
 最全面、最专业的CST微波工作室视频培训课程,可以帮助您从零开始,全面系统学习CST的设计应用【More..】
频道总排行
- CST2013: Mesh Problem Handling
- CST2013: Field Source Overview
- CST2013: Discrete Port Overview
- CST2013: Sources and Boundary C
- CST2013: Multipin Port Overview
- CST2013: Farfield Overview
- CST2013: Waveguide Port
- CST2013: Frequency Domain Solver
- CST2013: Import ODB++ Files
- CST2013: Settings for Floquet B


